Understand Router Nitro in a simple way

I am a third-year Computer Science Engineering student studying in Chandigarh. I am a full-stack web developer exploring the field of DevOps and gaining hands-on experience in it, including AWS.
What is Router Nitro?
Voyager is a cross-chain swapping engine or protocol designed to enable cross-chain asset transfers. It serves as a mechanism for seamlessly moving digital assets or tokens between different blockchain networks
Latest Version of Voyager i.e Voyager v2.0 employs a trustless method for managing cross-chain asset transfers. In this system, a forwarder entity delivers the requested asset to the user on the destination chain. After confirming the forwarder's successful settlement on the destination chain, they can access the user's deposited funds on the source chain
The majority use case of Nitro depends on swapping and transfer of token
Build Don't Talk
start this repo as we gonna talk and use this repo in future reference:
https://github.com/router-resources/Voyager-2-Cookbook
I know, you got bored of the theory. Not going into much theory from now on, let's start building. Clone the repository in your local.
git clone https://github.com/router-resources/Voyager-2-Cookbook
Install the necessary packages
npm instal
Run on localhost
npm start
open localhost:3000 in the browser and you're good to go.
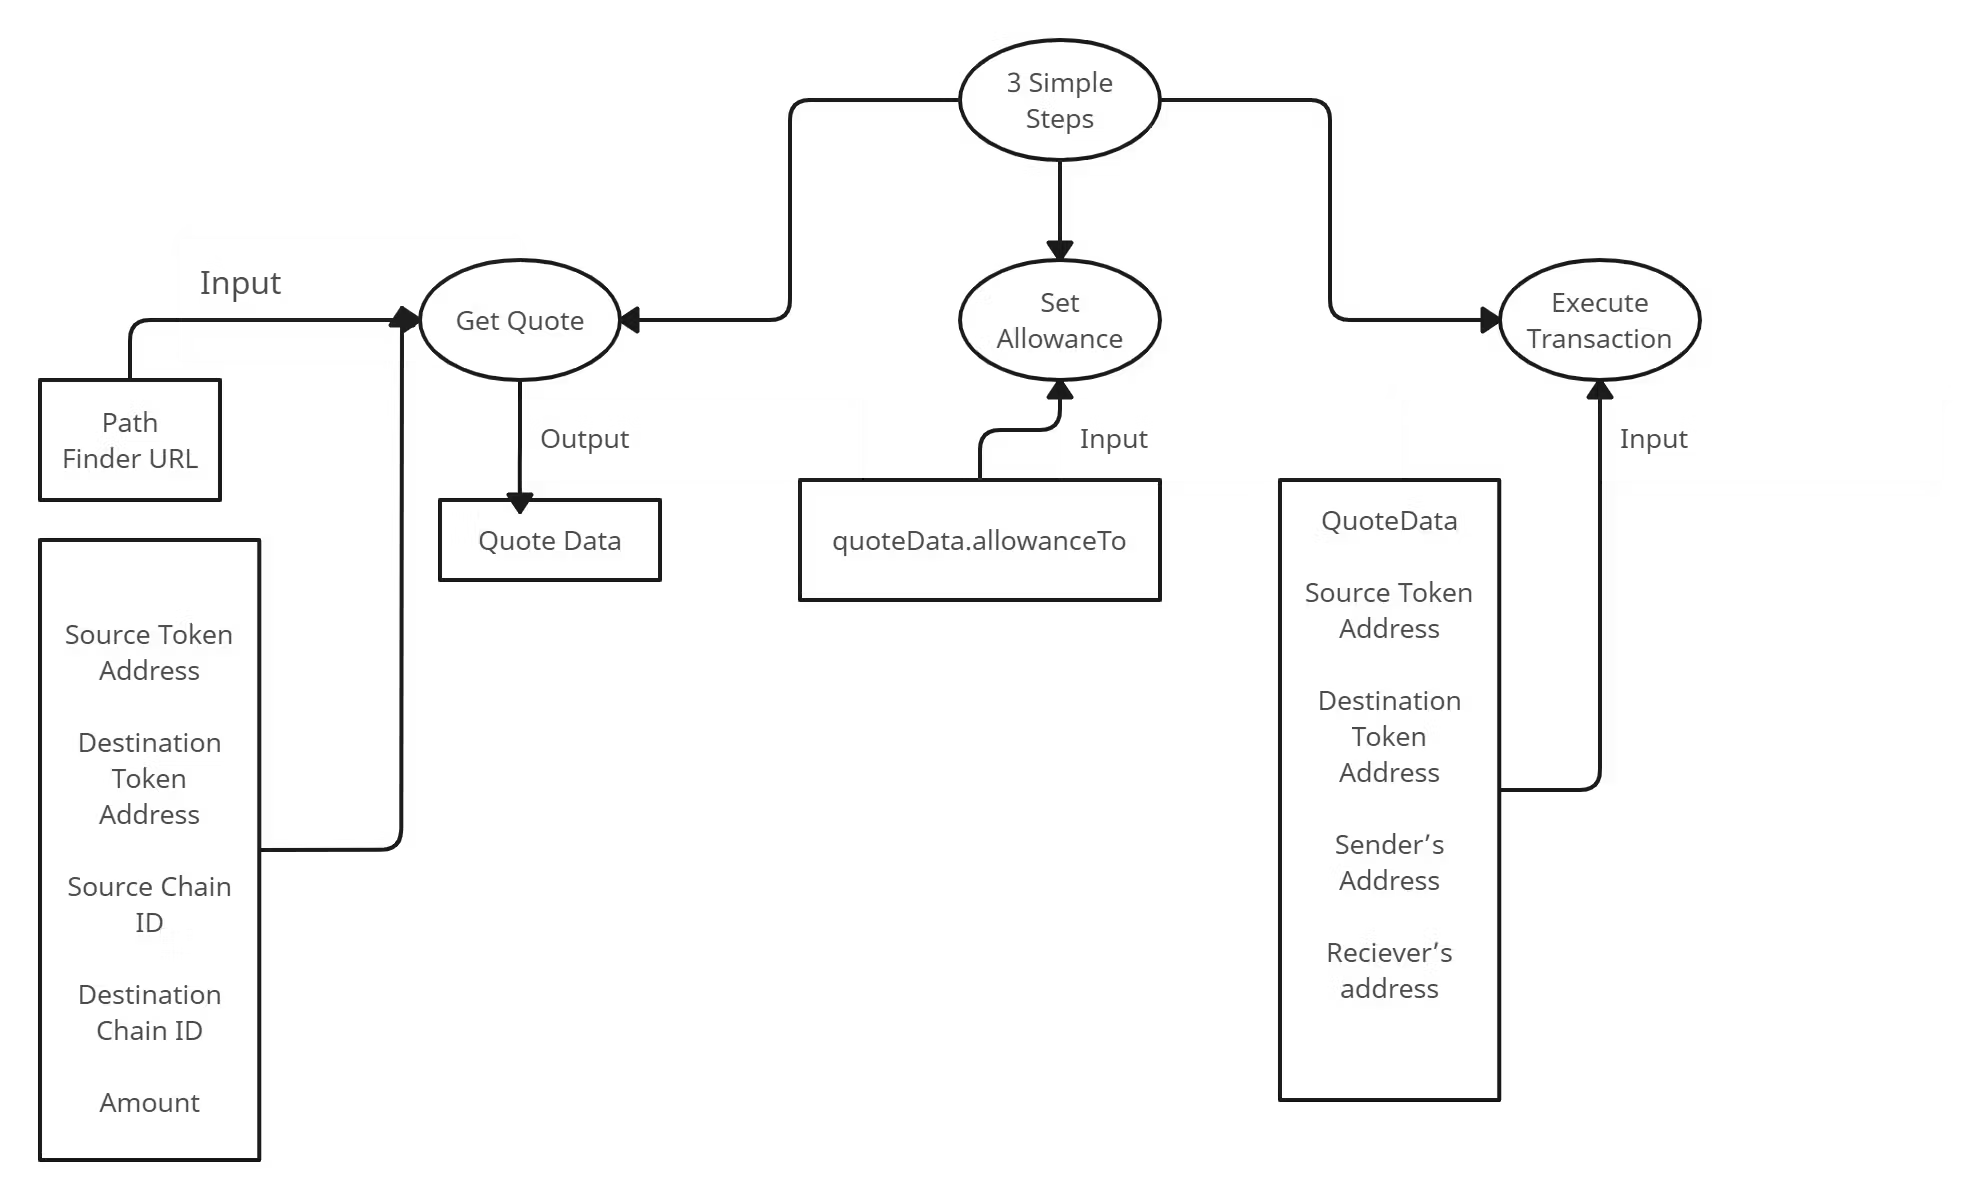
Building via Router Nitro is a 3-Step Process-
Step#1 Getting the Quote
1)Router Nitro enables you to interact with the Smart Contract and initiate Cross-Chain Token Transfers. The first step in this process is to request a Quote, which provides you with essential details about the proposed Token Transfer.
2)We Define a Path Finder API URL For The Nitro Testnet, the point where we send our Quote Request.
3)Another step is creating a getQuote function which uses the axios library to make an HTTP Get Request to the Nitro Path Finder API URL.
4)Later on, we call the getQuote function by passing appropriate Parameters. Some Parameters define the details of the token transfer you wish to execute. The parameters are- fromTokenAddress, toTokenAddress, amount, fromTokenChainId, toTokenChainId, widgetId.
Step#2 Checking for Approval
1)This Step involves Verification and Configuration of the allowance for Token Transfer. It allows Router's Swap to safely Transfer Tokens between different Blockchains.
2)We begin by defining an ABI (Application Binary Interface) for ERC20 Tokens, which is essential for interacting with ERC20 Token Contract. The checkAndSetAllowance function checks the current allowance, and if required, creates a new one.
3)Using the provided Token Address and ERC20 ABI Address, one can Create an instance of the ERC20 Contract. If the Current Allowance is less than the Desired Amount, we proceed to set a new allowance. We initiate an approval Transaction to the ERC20 contract, Granting Permission to Router's swap or Transfer Contract to withdraw tokens on your behalf.
4)The Code Handles the approved Transaction, monitors its status, and logs the Transaction hash upon Successful Confirmation. When the Button is clicked your signer (wallet) is set up and the checkAndSetAllowance function is called with the required parameters. You can find it in quote.allowanceTo in the quoteData obtained from Step 1.
Step#3 Executing the Transaction
1)This step involves Executing a Transaction. This process involves sending a Transaction To Perform The Cross-Chain Token Transfer initiated in Steps 1 and 2.
2)The function responsible for Executing the Transaction is getTransaction. It takes in the following parameters: fromTokenAddress, toTokenAddress, amount, fromTokenChainId, toTokenChainId, widgetId and quoteData from Step 1.
3)Later on, Call the getTransaction function with the necessary parameters to fetch the Transaction Data from the Nitro system.
4)The Send Transaction Initiates the transaction using the data obtained from the Nitro system.
Note: Currently router nitro is on the testnet and you can acess the live site from here https://nitro.routerprotocol.com/swap
Sample Application: https://github.com/router-resources/Voyager-2-Cookbook
Wait, Wait. What next then? We gonna build one simple application and I will guide you code by code on how to use it and integrate it into your Dapp.


